Monday 21 December 2015

Kyojin Build : XI | New look for Kyojin

Every drift machines needs its own identity and for Kyojin , I chose to go with one of the famous designers ' Andrew ' AKA  " AWS Graphics " and this guy if he is good at something he is a magician when doing car designs !

I provided andrew with images for my car and he drew it exactly as it is ! check the below 


then he took couple of ideas and directions from me and created his magic to finally receive this stunning artwork


Time to apply it : 


I went to Royal Wrap in Qatar and the work is AMAZING! WIP photos will be in a different post after doing a proper photoshoot for the car 


THE FINAL LOOK! 


Kyojin Build : X | 3 Rounds of drifting = 3 Podiums

So the car has finished ( Not tuned yet ) and so far I participated in 3 rounds of drifting in the Qatar Drift Championship by QRC  


1st Round   : 3rd Place 
2nd Round  : 1st Place
3rd Round  : 3rd Place 

Currently holding the 2nd overall in the season with 2 rounds left 

Check the images below 

Monday 19 October 2015

Kyojin Build : IX The Car through time

The Car is now completed here in this part of the blog you can see the development of the shape of the car during events I am attending 


1. Qatar Drift Championship | Round 1 


Photos from the round 1 of Qatar Drift Championship where I got the 3rd place in the Amateur Category. #KyojinDrift
Posted by Alaa Tarawneh on Saturday, October 17, 2015

Kyojin Build Part VIII : First Drift Competition

So After finishing the setup on 12th of October I particpated in Qatar Drift Championship by QRC www.qrc.qa and got the 3rd place in the Amature Drift Category


A side from today's event where I got 3rd Place in it #KyojinDrift
Posted by Alaa Tarawneh on Friday, October 16, 2015

Kyojin Build Part VII : START , TEST , RUN


THE START 
Hear Kyojin ROAR! #KyojinDrift
Posted by Alaa Tarawneh on Saturday, October 10, 2015


First baby steps for Kyojin #KyojinDrift
Posted by Alaa Tarawneh on Saturday, October 10, 2015

The Ignition 
How to start my Kyojin #KyojinQatar
Posted by Alaa Tarawneh on Thursday, October 15, 2015


The TEST  
The first proper test for Kyojin today! Running on stock computer not tuned No handbrake And minor issue with fuel pump but got that solved quickly after I finished
Posted by Alaa Tarawneh on Tuesday, October 13, 2015

Friday 24 July 2015

The Build Part V : Putting Things Together


HIn this post will show how parts look like while/after installing 


- Brembo Brakes ( Front )  ( 4 Pistons ) 


- Brembo Brakes ( Rear ) ( 2 Pistons ) 


- Tomei 2 Way LSD 
 

- 1JZ + R154 installed 

Knowing that the 1JZ engine is bigger than the FA20 engine the stress bar had to be removed in order to make the fitment also another problem came in while installing the R154 Transmission it was very huge to be installed that's why some cuts and welding was needed in the fitment 

Pictures below gor the final fitment 


Tuesday 21 July 2015

The Build Part IV : New look for Kyojin

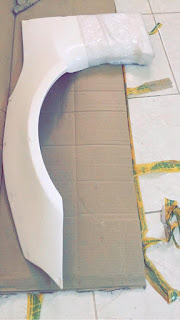
I was not willing to do any upgrades on the looks of my GT86 but got a super cheap deal for Rocket Bunny Kit ( 8 pieces ) for front and back fenders to make it wider so decided to buy it and use it .

Here are the images for the parts bought yesterday 20th of July 2015 .


The parts shows the front and back Rocket Bunny side fenders that will give the car a wide body look. Excited to install these on my car.


Final Shape of the car will be posted here . but it should look like something like this

FRS Rocket Bunny Ver. I [ Image by speedhunters.com ] 

On September 13th the GT wing arrived 


Wednesday 15 July 2015

The Build Part III : Getting it ready

It is time to put all of these together but first let us strip the car down ;) 


- We say goodbye to the old engine 

Car been in the garage for two weeks to make all the parts ready and do the wire mapping for it before stripping it down! 


Photo for the engine before completing the swap 
Goodbye FA20


- The front bumper is out now and for those who did it by themselves they would know how hard it is to do it . 


Front face is all removed ( Lights , Intercooler , bumper ) it hurts so much to see such thing :'( but the coming will be better 


Car is on the Jack and NO ENGINE IS INSIDE !!! Wohoo completed the removal of the engine 


This is the setup as of 15th of July 2015 
Waiting for 1JZ mounting kit as the one we brought earlier was not for the GT86/FRS and along with that we will have the Hydraulic Handbrake too :) 


Will complete the setup next week when parts comes 


The Build Part II : The Parts

So... 1JZ to be installed on the Toyota 86! Hmmm went through a lot of forum and very famous ones too but all seem to trash you if you don't know what you are doing! well no one was born with a screwdriver in his hand ... that's why we learn and do mistakes.

In my buildup I will do mistakes ( hopefully not ) , put money to waste if I did not read a lot about what is going on and what to do.

To start of with the parts, we will start with the engine :


1. Toyota 1JZ GTE 2.5 Twin Turbo engine

The engine was modified to work on a single turbocharger.


2. T-70 TurboCharger 


3. R154 5-Speeds Manual Transmission 

4. Exedy Stage 4 dual clutch 

5. Greddy Intercooler


6. Tomei 2 Way LSD


7. S-Blade Fans


8. KSport Slide Kontrol Drift Coilovers


9. Brembo Brakes :
- 4 Pistons brakes ( Front ) , 2 Pistons brakes ( Rear ) 


10 . DriftWorks Hydraulic Handbrake with Wilwood master cylinder 


11. Enjuku Racing Mounting Kit for 1Jz


12. Tubrosmart Comp Gate 40 

13. AEM series 2 computer


List is up to date (19 Jan 2016 ) 
Other parts will be listed below once they arrive